Pretty much everyone who has worked out at a gym has had the experience of getting advice (frequently unsolicited) about how to do an exercise properly. frequently, this advice comes with the intent of helping you avoid injury, maximize your efficiency, or to hit on you. However, I am about to blow your mind with a revelation. People come in all shapes and sizes. Brilliant as this view of human nature may be, it is something that is forgotten far too often in the gym. People are not machines. We are not all built the same way, move uniformly, or require the same fuel. Many anatomical differences mean each person will need to move in a customized way that suits their body, and unless you’re ambidextrous you shouldn’t expect to move the same way with each side of your body. So all that advice you’re getting on how to squat normally may be a load of crap, but I am here to explain how you can do the best with what you got to perfect your body’s normal.
Don’t go running off to the gym and start using the equipment all willy nilly thinking that there is no wrong way to move. Because there is. It’s a large part of my job to make sure you don’t jack yourself up by doing something you saw on Instagram. When it comes to movement, I worry about the red flags, not the minutia. A red flag that can be revealed by a squat test might include knee valgus, or knock knees. We know this can lead to knee pain and ACL tears in athletes (1). There you have it, folks! If you’re an athlete and you have knock knees then you should work on that. Do you have back pain? Well if you hurt you back by falling down, doing a dead lift, or in a car accident, then those are red flags. But there is no magic stretch, strengthening program, or posture that are red flags or fixes for that matter. I’ve written about it before, but I’ll say it again “Neck pain is not greatly associated with neck posture (2). Sagittal (front to back) spinal curve does not relate to spinal health or back pain (3). It is highly likely that we all have disc degeneration, a bulging disk, and/or protruding disk in our back right now, and that’s normal (4). It’s not an unequal leg length that’s causing your back pain (5). Even the best athletes in the world have asymmetrical muscle size and movement patterns, and they don’t have issues caused by them (6,7).“
Why We Must Move Differently
I’ll keep this brief. We must all move differently because of our bone structure, muscle/tendon location, and injury history requires us to. We are all so different that it’s impossible to define perfect posture let alone perfect movement. As our bones grow and change, they don’t do so uniformly. Most people know that women have wider hips than men because of the birthing process. Well, there are similar genetic differences amongst everyone that can lead to the bones of the hip to stop you from moving in an “optimal” way (8). It’s also why the phrase “squat like a baby” is total crap. The image bellow gives a good visual on how the hip can be different from person to person. This is why no amount of foam rolling, stretching, or muscle activation will help with “tight hips” in some individuals.
Making It Work For You
So here’s where we get down to business. If you, or someone you know, have specific questions about pain, performance, or application of any of the following suggestions, be sure to set up a one on one session with me by replying to this email so we can get into specifics for you.
It’s no secret that exercising can come with aches and pains. Commonly, the shoulder, back, and knee joints. What you need to know is that pain does not always mean there is tissue damage. It may simply mean you are overstressing a particular structure. Which is why switching from back squat to front squat can alleviate knee pain even though you are still putting pressure on the joint. If your knees move towards the outside of your feet too much try taking off your shoes (9). If squatting makes your back hurt, decrease the amount of weight that you use, squat deeper, and allow your knees to go in front of your toes as seen in the picture below (10). You can also adjust the depth of the squat, foot stance, and barbell location to target specific muscles which I wrote about extensively in this post.
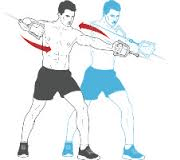
If you want to build a bigger chest, use less weight on your bench press because of the heavier the weight the more you use your shoulders and triceps (11). In fact, getting more reps in is the name of the game. Stretching before you exercise will decrease the strength and muscle gain you can achieve, and may not even be achieving anything worthwhile, to begin with (hip flexors in particular) (12). A little cheating isn’t always a bad thing if a bit of a swinging/momentum gets you to squeeze out an extra few reps (13). At the end of the day, perfecting your normal means you are experimenting with technique so you don’t feel pain/do feel the targeted muscles work, you are getting as many weighted reps in a possible, and you gradually increase your body’s ability to do more work. This may require a trained eye, but it will never require a universally true way to do things.
Resources
1. Quatman, C. E., Kiapour, A. M., Demetropoulos, C. K., Kiapour, A., Wordeman, S. C., Levine, J. W., … & Hewett, T. E. (2014). Preferential loading of the ACL compared with the MCL during landing: a novel in sim approach yields the multiplanar mechanism of dynamic valgus during ACL injuries. The American journal of sports medicine, 42(1), 177-186.
2. Grob, D., Frauenfelder, H., & Mannion, A. F. (2007). The association between cervical spine curvature and neck pain. European Spine Journal, 16(5), 669-678. doi:10.1007/s00586-006-0254-1
3. Christensen, S. T., & Hartvigsen, J. (2008). Spinal curves and health: A systematic critical review of the epidemiological literature dealing with associations between sagittal spinal curves and health. Journal of Manipulative and Physiological Therapeutics, 31(9), 690-714. doi:10.1016/j.jmpt.2008.10.004
4. Brinjikji, W., Luetmer, P. H., Comstock, B., Bresnahan, B. W., Chen, L. E., Deyo, R. A., . . . Jarvik, J. G. (2015). Systematic literature review of imaging features of spinal degeneration in asymptomatic populations. AJNR. American Journal of Neuroradiology, 36(4), 811-816. doi:10.3174/ajnr.A4173
5. Grundy, P. F., & Roberts, C. J. (1984). Does unequal leg length cause back pain? A case-control study. Lancet (London, England), 2(8397), 256.
6. Hides, J., Fan, T., Stanton, W., Stanton, P., McMahon, K., & Wilson, S. (2010). Psoas and quadratus lumborum muscle asymmetry among elite australian football league players. British Journal of Sports Medicine, 44(8), 563-567. doi:10.1136/bjsm.2008.048751
7. Hespanhol Junior LC, De Carvalho AC, Costa LO, Lopes AD. Lower limb alignment characteristics are not associated with running injuries in runners: Prospective cohort study. Eur J Sport Sci. 2016 Jun:1–8. PubMed #27312709.
8. Pollard, T. C. B., Villar, R. N., Norton, M. R., Fern, E. D., Williams, M. R., Murray, D. W., & Carr, A. J. (2010). Genetic influences in the aetiology of femoroacetabular impingement. Bone & Joint Journal, 92(2), 209-216.
9. Southwell, D. J., Petersen, S. A., Beach, T. A., & Graham, R. B. (2016). The effects of squatting footwear on three-dimensional lower limb and spine kinetics. Journal of Electromyography and Kinesiology, 31, 111-118.
10. Hartmann, H., Wirth, K., Mickel, C., Keiner, M., Sander, A., & Yaghobi, D. (2016). Stress for Vertebral Bodies and Intervertebral Discs with Respect to Squatting Depth. Journal of Functional Morphology and Kinesiology, 1(2), 254-268.
11. Król, H., & Golas, A. (2017). Effect of Barbell Weight on the Structure of the Flat Bench Press. The Journal of Strength & Conditioning Research, 31(5), 1321-1337.
12. Junior, R. M., Berton, R., de Souza, T. M. F., Chacon-Mikahil, M. P. T., & Cavaglieri, C. R. (2017). Effect of the flexibility training performed immediately before resistance training on muscle hypertrophy, maximum strength and flexibility. European journal of applied physiology, 1-8.
13. Arandjelović, O. (2013). Does cheating pay: the role of externally supplied momentum on muscular force in resistance exercise. European journal of applied physiology, 113(1), 135-145.